Downward Facing Dog Stretching
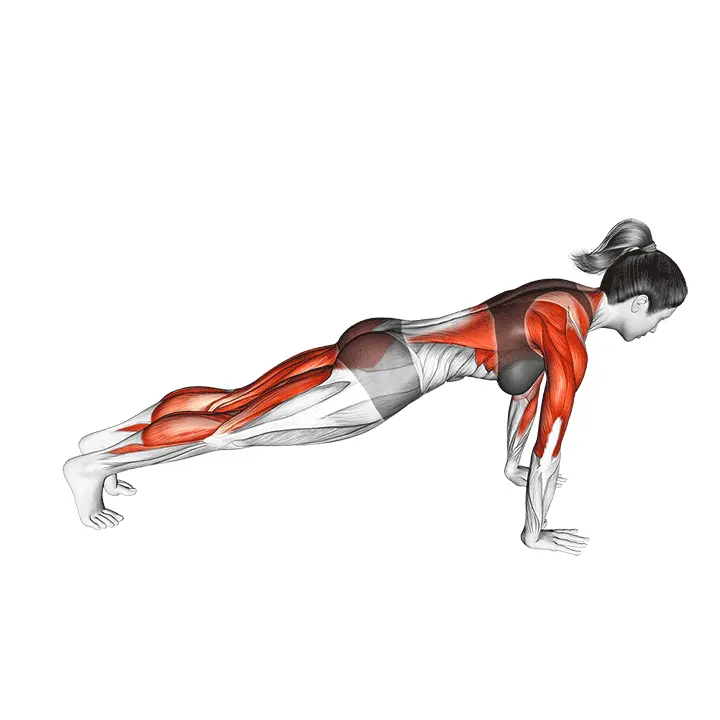
Downward Facing Dog is a yoga pose that opens the posterior chain, shoulders, and ankles. It improves mobility, body control, and activates the core. Suitable for warming up or restorative stretching.
AI Analysis
Required equipment
Why Downward Facing Dog Stretching?
Downward Facing Dog is one of yoga's iconic poses, providing a comprehensive stretch and strengthening for the entire body. This pose is known for its ability to effectively open the body's posterior chain – hamstrings, calves, and back – while stretching the shoulders and improving ankle mobility. It is an excellent choice for both beginners and more experienced fitness enthusiasts, and it can easily be adapted to suit individual body needs. You only need a yoga mat or another non-slip surface to perform it, making it great for home workouts. Why is Downward Facing Dog so effective? The pose lengthens the spine, releases tension from the neck and shoulders, and activates deep abdominal muscles, improving body control and core support. It increases blood flow to the brain, which can refresh the mind and relieve stress. Regular practice helps develop flexibility and strength, supporting better posture and reducing the risk of injury in other exercises. This stretch is excellent as part of a warm-up before more intense training, preparing the muscles for action and improving the range of motion. On the other hand, it also works wonderfully as a restorative stretch after a workout, helping the muscles relax and recover from exertion. It is easy to incorporate into a daily routine and offers a quick way to refresh the body and mind.
Benefits
Effectively opens the body's posterior chain.
Improves shoulder and chest flexibility.
Increases ankle mobility and strength.
Strengthens core muscles and body control.
Lengthens the spine and relieves back tension.
Promotes mental relaxation and stress relief.
Improves circulation throughout the body.
Muscle groups
Primary
- hamstring7
- hamstring7
- calves6
- calves6
Secondary
- deltoids5
- deltoids5
- upper-back4
- upper-back4
Stabilizers
- lower-back3
- abs4
- gluteal3
- gluteal3
How to perform
Setup
- Get into a tabletop position on your yoga mat, with wrists under shoulders and knees under hips.
- Spread your fingers wide and anchor your palms to the floor, especially at the base of the thumb and index finger.
- Gently activate your core and tuck your toes under.
Execution
- Lift your knees off the floor and push your pelvis upward and backward, straightening your legs as far as your mobility allows.
- Press your palms evenly into the floor, keeping your arms active and your chest directed towards your thighs.
- Keep your spine long, shoulders away from your ears, and heels aiming towards the floor (they can remain lifted). Breathe calmly for 30–60 seconds.
Coaching cues
- •Keep weight evenly distributed in your hands and feet; do not collapse onto your wrists.
- •Lengthen first in the spine – if your lower back rounds, bend your knees slightly to maintain a neutral position.
- •Imagine turning your upper arms outward and slightly forward so that your neck and shoulders remain open.
Common mistakes
❌ Rounding the back
Why it's wrong: If the back is rounded, the stretch does not target the posterior chain correctly and may strain the lower back. The pelvis cannot rise sufficiently.
✓ Fix: Bend your knees deeper and push your pelvis strongly upward and backward until your back straightens. The goal is a straight line from wrists to hips.
❌ Tensing and raising shoulders to ears
Why it's wrong: This creates unnecessary tension in the neck and shoulders, preventing relaxation and deepening of the pose.
✓ Fix: Relax your neck and let your head hang freely. Push your shoulder blades down towards your back and spread your shoulders away from your ears.
❌ Focusing weight on the wrists
Why it's wrong: Excessive pressure on the wrists can cause pain and tension, preventing force distribution throughout the arm.
✓ Fix: Spread your fingers wide and actively press the bases of your palms and fingertips into the mat. Focus on 'suctioning' the mat with your hands, distributing weight evenly.
Frequently asked questions
How often should I do Downward Facing Dog stretch?
You can do it daily or several times a week, depending on your goals and body needs. It fits well into a morning routine or post-workout recovery. Always listen to your body and avoid overstretching. Consistency is key to improving mobility.
Why should I bend my knees in this position?
Bending the knees helps straighten the spine and lift the pelvis upward. This shifts the stretch better from the hamstrings and calves to the spine and shoulders, making the pose more comfortable and effective, especially for beginners or tight individuals. It allows for a deeper, safer stretch.
What should I do if my wrists hurt in Downward Facing Dog?
Ensure that weight is evenly distributed across your palm, especially at the bases of your fingers and thumb. Spread your fingers wide like a suction cup. You can also try warming up your wrists before the pose or using padding under your wrists. If necessary, shorten the duration of the pose and strengthen your wrists with other exercises.
Can Downward Facing Dog help with back pain?
Yes, it can relieve various types of back pain by stretching the spine, opening the posterior chain, and strengthening the core. It also helps release tension from the neck and shoulders, which often affects the back. Perform the movement carefully and avoid pain, especially if you have an acute back injury.
Safety tips
- Listen to your body and avoid pain; the stretch should feel pleasant, not painful.
- Keep your knees slightly bent if your hamstrings are tight to keep your back straight and protect your lower back.
- Distribute weight evenly across your palms and fingers to avoid overloading your wrists.
- Avoid raising your shoulders to your ears; keep your neck relaxed and shoulder blades down towards your back.
- If you have wrist, shoulder, or back injuries, consult a professional before performing or deepening the movement.
Tags
Train smarter with AI coaching
Tsemppi's AI gives you exact weights and reps for every workout. Progress every single session.
Start your free 7-day trial✨ Limited spots available • No credit card required