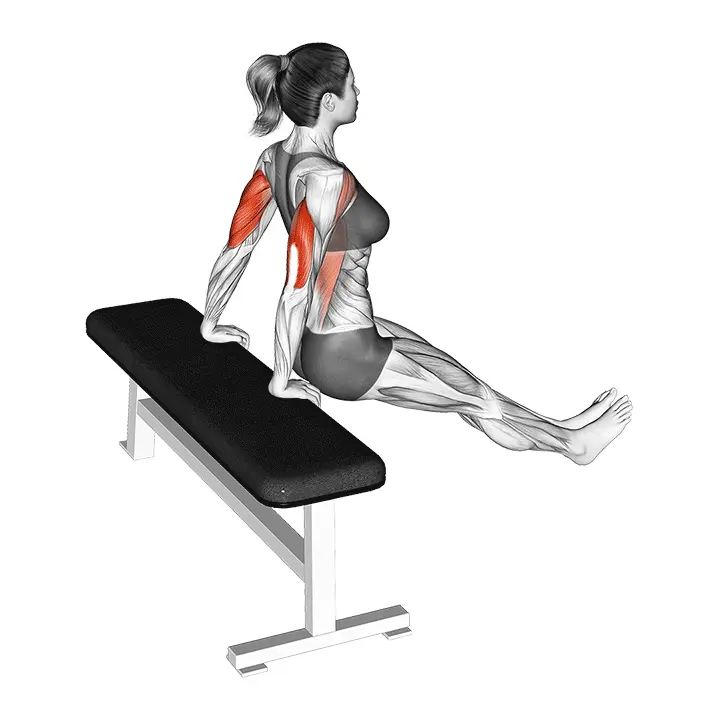
Bench Dip On Floor
The floor dip with arms fixed is a bodyweight exercise that focuses on the triceps and shoulder stabilization while keeping the upper arms almost stationary. This movement is suitable for spaces without equipment and develops elbow extension strength and scapular control.
AI Analysis
Required equipment
Why Bench Dip On Floor?
The floor dip is an excellent bodyweight exercise that effectively targets the strengthening of the triceps and shoulder stabilization. This movement is an ideal option when you want to train your upper body without equipment – whether at home, on the go, or even in the office. It is great for fitness enthusiasts of all levels, especially beginners who want to build foundational strength and improve body control. The effectiveness of the movement lies in isolating the triceps to work efficiently while keeping the upper arms almost stationary. This helps develop elbow extension strength and improve scapular control, which is important in many daily activities and other upper body strength movements. The floor dip is also a great way to prepare the body for more challenging dip movements or other pushing exercises, such as push-ups. It allows you to safely learn the correct movement pattern and activate the right muscles without the risk of overexertion that can occur with heavier weights. Thus, it is not only an effective workout but also an important part of injury prevention and functional strength development.
Benefits
Effectively strengthens the triceps.
Improves shoulder stability.
Develops upper body control.
Increases elbow extension strength.
Suitable for training without equipment.
Helps with everyday lifting tasks.
Prepares for more challenging movements.
Muscle groups
Primary
- triceps9
- triceps9
Secondary
- deltoids6
- deltoids6
Stabilizers
- chest4
- chest4
- abs4
- upper-back3
- upper-back3
- forearm3
- forearm3
How to perform
Setup
- Sit on the floor with knees bent and heels on the floor about hip-width apart.
- Place your palms on the floor behind you with fingers pointing to the sides or towards your feet.
- Keep your chest open, gently pull your shoulder blades back and down, and engage your core.
Execution
- Press your palms into the floor and lift your hips slightly off the ground (not mandatory) while keeping the upper arms almost stationary.
- Lower yourself by bending your elbows backward towards the floor, stopping when the shoulder joint remains neutral and you feel a stretch in the triceps.
- Extend the elbows powerfully to return to the starting position without letting the shoulders rise to the ears or the elbows flare out to the sides.
Coaching cues
- •Keep the upper arms as stationary as possible – the movement comes from the elbow joint.
- •Gently squeeze the shoulder blades towards your pockets, avoiding the shoulders rising and the shoulders rotating forward (anterior glide).
- •Direct the elbows backward, not to the sides, and keep the wrist neutral.
- •Adjust the difficulty by moving your feet further away (harder) or closer (easier).
Common mistakes
❌ Lowering the hips too far or too far from the hands
Why it's wrong: When the hips drop too low or far from the hands, the load shifts away from the triceps and can strain the shoulders unnaturally. The movement easily becomes swinging and does not target the right muscles.
✓ Fix: Keep the body close to the hands and lower the hips only enough for the triceps to do the work. Focus on extending the elbows straight back and keep the abdominal muscles lightly engaged.
❌ Shoulders rising to the ears
Why it's wrong: If the shoulders rise to the ears, the neck tenses and the shoulders are improperly strained. This often indicates insufficient scapular support and may lead to pain or injuries.
✓ Fix: Keep the shoulders down and the scapulae lightly together and pulled down. Push the floor away with the shoulders and imagine pulling the scapulae towards your back pockets.
❌ Too large a range of motion or rushing
Why it's wrong: A too deep range of motion or fast tempo can lead to loss of control and strain the shoulders harmfully, especially if mobility is insufficient. Quality suffers at the expense of quantity.
✓ Fix: Perform the movement slowly and in a controlled manner. Start with a smaller range of motion and deepen it only when you fully control the movement and feel the triceps doing the work. Focus on muscle awareness.
Frequently asked questions
How can I make the floor dip more challenging?
You can increase the challenge by elevating your feet on a platform, such as a chair or bench. Also, deepening the range of motion, slowing down the repetitions, or adding holds (e.g., a few seconds at the bottom) increases resistance. You can also try performing the movement one arm at a time if you are already very strong.
Is this movement suitable for more experienced trainers?
Yes, it is! Although the movement is beginner-friendly, it is an excellent accessory exercise for the triceps and shoulders for more experienced individuals as well. It serves as a great warm-up, recovery exercise, or part of a longer drop set. It can help refine technique and provide a good feel for the triceps.
Does the movement feel in the shoulders?
When done correctly, the movement focuses on the triceps, and the shoulders should mainly feel the work related to stability. If you feel pain in the shoulders, check your technique: keep the shoulders down and the elbows close to the body. Ensure that you do not let the shoulders rotate forward or rise to the ears. Reduce the range of motion if necessary.
Do I need an exercise mat to perform this movement?
An exercise mat is not essential, but it can add comfort, especially if the floor is hard or cold. The mat can also help keep your hands in place and prevent slipping, improving safety. However, the movement can be performed excellently without a mat as long as the surface is not slippery.
Safety tips
- Always start with a careful warm-up, especially for the shoulders and elbows.
- Focus on good technique and muscle awareness before increasing repetitions or resistance.
- Do not let the shoulders roll forward or rise to the ears at any point during the movement.
- Keep the elbows close to the body and pointing backward, not to the sides.
- Listen to your body and stop immediately if you feel sharp pain in the shoulders, elbows, or wrists.
Tags
Train smarter with AI coaching
Tsemppi's AI gives you exact weights and reps for every workout. Progress every single session.
Start your free 7-day trial✨ Limited spots available • No credit card required