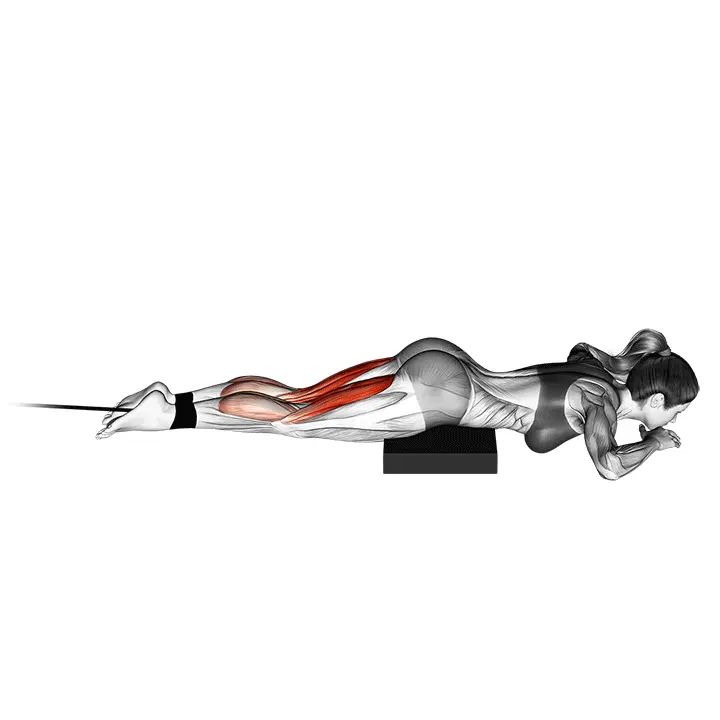
Resistance Band Leg Curl
The resistance band leg curl specifically targets the hamstrings and glutes. Suitable for home or gym, it is a joint-friendly alternative to traditional leg curl machines.

AI Analysis
Required equipment
Why Resistance Band Leg Curl?
The resistance band leg curl is an excellent exercise for strengthening the hamstrings and glutes, providing an effective and joint-friendly alternative to traditional gym equipment. This movement is great for both beginners and more experienced fitness enthusiasts looking for versatile ways to develop lower body strength and endurance. It is easy to perform both at home and in the gym, as long as you have a resistance band, ankle strap or loop, and a sturdy attachment point. The greatest advantage of this movement lies in its ability to provide continuous resistance throughout the entire range of motion, which activates the hamstrings and glutes more effectively than many free weight exercises. The tension of the resistance band forces the muscles to work during both the curling and returning phases, promoting muscle growth and strength development. Since this is an isolation exercise, you can fully focus on the feeling and activation of the hamstrings without other muscle groups dominating the performance. This exercise is particularly beneficial for those with knee or lower back issues, as it places significantly less strain on the joints compared to heavy deadlifts or traditional leg curl machines. It helps improve the strength and flexibility of the hamstring muscles, which can prevent common sports injuries, such as hamstring strains. Additionally, strong hamstrings support knee health and improve overall body control. With a resistance band, you can easily adjust the resistance to suit your needs, making this movement a cornerstone of progressive and long-term training. Incorporate this exercise into your workout routine, and you will soon notice a difference in your lower body strength and functionality!
Benefits
Effectively strengthens the hamstrings and glutes.
Improves stability of the knees and hips.
Reduces the risk of sports injuries in the lower limbs.
Develops functional strength for daily activities and sports.
Offers a joint-friendly exercise option.
Allows for easy training anywhere.
Increases endurance of lower body muscles.
Muscle groups
Primary
- hamstring10
- hamstring10
Secondary
- gluteal6
- gluteal6
Stabilizers
- calves3
- calves3
- lower-back3
- quadriceps2
- quadriceps2
- abs4
How to perform
Setup
- Attach the resistance band low, close to the floor (e.g., to the bottom of a door or a pole).
- Attach one end of the band to your ankle with an ankle strap or the loop of the band.
- Position yourself lying face down or standing in a slight forward lean against support; keep your knees slightly bent and pelvis in a neutral position.
Execution
- Pull your heel towards your glute by bending your knee in a controlled manner until you feel a clear contraction in your hamstring.
- Pause the movement momentarily at the top position and squeeze the hamstring.
- Slowly return your leg to the starting position while maintaining resistance throughout the entire range of motion. Repeat the desired number of repetitions and switch legs.
Coaching cues
- •Keep your pelvis still – avoid arching your lower back or rotating your pelvis.
- •The movement occurs at the knee joint; avoid excessive bending of the ankle or 'kicking' with your toes. Build tension especially in the lower and middle phases of the movement, do not let the band snap back.|Adjust the tightness of the band by moving further away from or closer to the attachment point or by choosing a stiffer band.
Common mistakes
❌ Too fast movement
Why it's wrong: The movement is performed with jerking or the return phase is uncontrolled. This weakens muscle activation and can lead to injuries.
✓ Fix: Perform the movement slowly and in a controlled manner in both directions, focusing on muscle contraction and a slow return.
❌ Raising the pelvis or arching the back
Why it's wrong: The movement is performed by arching the back or lifting the pelvis off the ground. This shifts the load away from the hamstrings to the lower back, causing strain and weakening the hamstring workout.
✓ Fix: Keep the pelvis firmly on the ground and focus on keeping your abdominal muscles engaged throughout the movement.
❌ Resistance band too loose
Why it's wrong: The band is not securely attached or slips, resulting in insufficient resistance. This reduces the effectiveness of the movement.
✓ Fix: Ensure the resistance band is tightly secured at the attachment point and that the ankle strap or loop is properly secured to your leg, providing continuous tension.
Frequently asked questions
How often should I do resistance band leg curls?
You can include it 2-4 times a week in your lower body or full-body workouts. For beginners, 2 times a week is a good start. Listen to your body and give your muscles enough time to recover.
Can this movement help develop muscle mass?
Yes, resistance band leg curls can help develop muscle mass, especially if you use a sufficiently thick resistance band and follow rep and set ranges aimed at muscle growth. Continuous tension and proper technique are key.
Is resistance band leg curl more effective than traditional machines?
It is an effective alternative, but 'more effective' depends on your goals. Resistance bands provide continuous tension and are more joint-friendly. Machines often allow for heavier loads. The best approach is to combine both or choose based on what best suits your needs and environment.
How do I choose the right thickness of resistance band?
Start with a lighter band that allows you to perform the movement with clean technique for the desired number of repetitions. When the movement feels too easy, switch to a thicker band. The goal is to challenge the muscles without sacrificing technique.
Safety tips
- Ensure the resistance band is always securely attached to prevent it from coming loose during the movement.
- Perform the movement in a controlled manner and avoid jerky motions that could strain the joints or cause injuries.
- Warm up your muscles thoroughly before exercising and stretch lightly afterward.
- Listen to your body; if you feel pain, stop the movement and check your technique or the amount of resistance.
- Always keep your abdominal muscles engaged to protect your lower back.
Tags
Train smarter with AI coaching
Tsemppi's AI gives you exact weights and reps for every workout. Progress every single session.
Start your free 7-day trial✨ Limited spots available • No credit card required