Low Lunge Yoga Pose Anjaneyasana I
Anjaneyasana, or low lunge, opens the hip flexors and quadriceps while improving pelvic mobility. The pose also stretches the hamstring of the back leg and strengthens core control. It is suitable for warming up, restorative practice, and alleviating tightness in the hips.

AI Analysis
Required equipment
Why Low Lunge Yoga Pose Anjaneyasana I?
Anjaneyasana I, or low lunge, is a foundational yoga pose that provides an excellent way to open up the body's tightest areas. This pose is particularly effective for stretching the hip flexors and quadriceps, which often become tight due to sedentary work or intense exercise. As these muscles stretch, pelvic mobility improves significantly, which can help alleviate lower back pain and enhance posture. Anjaneyasana I not only stretches but also strengthens. Maintaining the pose requires core activation, which improves body control and balance. The gentle stretch of the hamstring in the back leg makes the pose more holistic. It is great for warming up before more intense training, restorative practice after a long day, or as part of a yoga routine to ease hip tightness. This beginner-friendly pose is accessible to almost everyone and can be modified to suit individual body needs. For example, you can place a cushion under the knee or use yoga blocks for support if reaching the floor feels challenging. Regular practice helps increase flexibility, reduce muscle tension, and improve overall well-being. It is an excellent choice if you want to enhance mobility and relieve tightness in a pleasant and effective way.
Benefits
Effectively opens the hip flexors.
Deeply stretches the quadriceps.
Improves pelvic mobility.
Strengthens core control.
Alleviates lower back tightness.
Increases body flexibility.
Enhances posture.
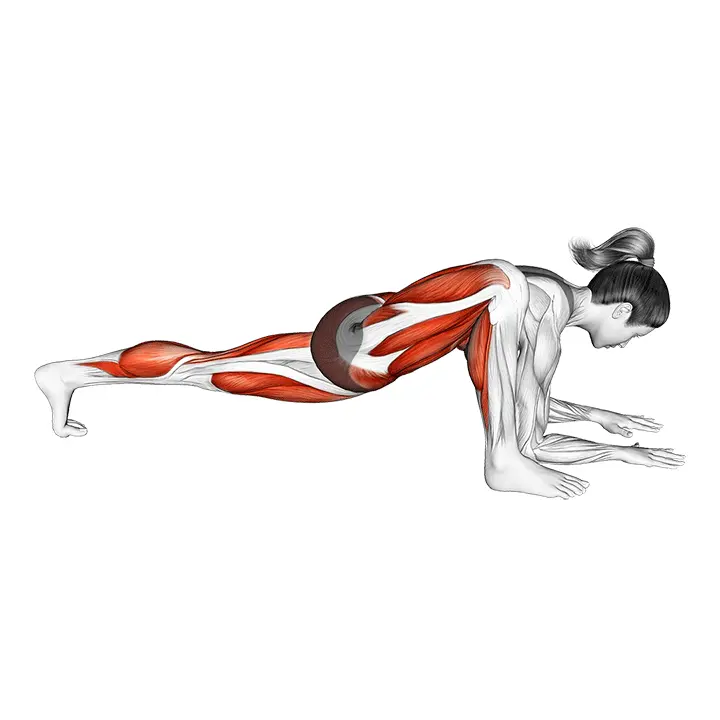
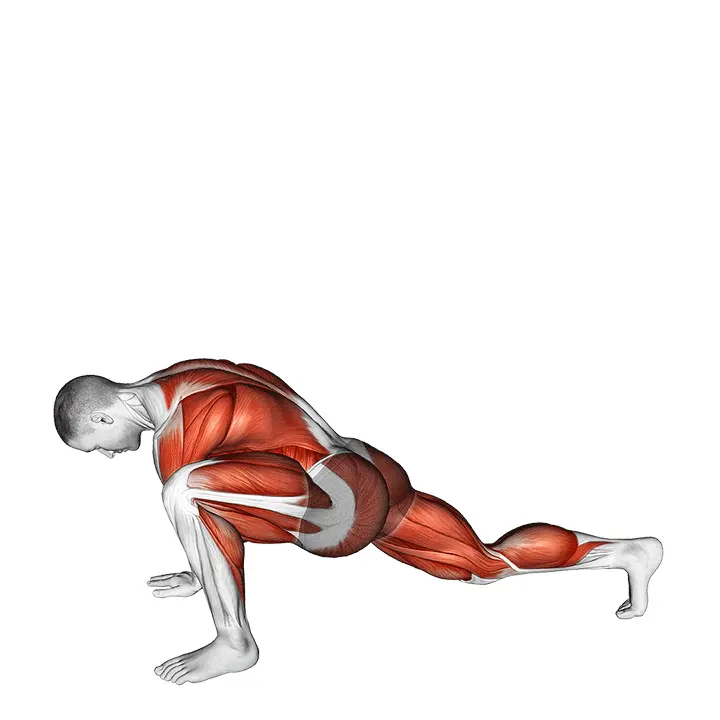
Muscle groups
Primary
- adductors6
- adductors6
- quadriceps7
- quadriceps7
Secondary
- hamstring5
- hamstring5
- calves3
- calves3
Stabilizers
- gluteal5
- gluteal5
- abs4
- lower-back3
- obliques3
- obliques3
How to perform
Setup
- Step into a long lunge: front knee directly above the ankle, back knee on the ground and the top of the foot relaxed.
- Align the pelvis forward and keep the spine neutral, chest open.
- Engage light core support and gently draw the tailbone down to avoid excessive arching in the lower back.
Execution
- Gently slide the pelvis forward and down until you feel a stretch in the front hip flexor and the quadriceps of the back leg.
- Raise your arms up beside your ears or place your hands on your hips/yoga blocks for support.
- Hold the pose for 30-60 seconds, breathing calmly into the sides and abdomen; then switch sides.
Coaching cues
- •Keep the front knee aligned with the second toe, do not let the knee collapse inward.
- •Avoid excessive arching of the lower back: support the abdomen and keep the chest long upwards, not arched back. Ensure both iliac crests of the pelvis are pointing forward (pelvic square).
Common mistakes
❌ Knee too far forward or back
Why it's wrong: The front knee should not go past the toes to avoid excessive pressure on the knee joint. The position of the back knee affects the depth of the stretch.
✓ Fix: Ensure that the front knee is directly above the ankle. Adjust the position of the back leg so that you feel a pleasant stretch in the hip flexors.
❌ Arching or rounding the back
Why it's wrong: If the back arches too much, the pelvis tilts forward and the stretch shifts away from the hip flexors. A rounded back can strain the lower back.
✓ Fix: Keep the core engaged and the back long. Imagine gently pulling the navel towards the spine and reaching the crown of your head upwards.
❌ Tension in the shoulders and neck
Why it's wrong: We often unconsciously tense our shoulders and neck, which can diminish the relaxing effect of the pose and cause additional tension.
✓ Fix: Relax the shoulders away from the ears and keep the neck long. If the hands are on the floor, ensure that the shoulders are relaxed and the shoulder blades are gently drawn down.
Frequently asked questions
How deep should I go in Anjaneyasana?
Go only as deep as you feel a pleasant stretch without pain. The goal is to stretch, not to tear. The body will gradually adapt, so listen to it and deepen the pose only when it feels natural.
Can I use props in this pose?
Yes, absolutely! A yoga mat adds comfort under the knee. Yoga blocks under the hands can help if reaching the floor is challenging, allowing you to better focus on stretching the hip flexors and maintaining posture.
Why does my lower back feel sore in this pose?
Lower back pain may result from excessive arching. Ensure you keep the core engaged and the pelvis in a neutral position. Gently draw the navel inward and let the pelvis descend straight down, not forward.
How often should I practice Anjaneyasana?
You can practice Anjaneyasana several times a week, even daily, if it feels good and helps relieve tightness. Short, regular stretches are often more effective than infrequent, long sessions.
Safety tips
- Listen to your body: Do not force yourself into pain. The stretch should feel pleasant, not painful.
- Cushion the knee: If the knee of the back leg feels sensitive, double up the yoga mat or use a blanket underneath.
- Keep the knee aligned: Ensure that the front knee is directly above the ankle to avoid unnecessary stress on the knee joint.
- Activate the core: Keep the abdominal muscles lightly engaged to protect the lower back and support posture.
- Breathe deeply: Deep and steady breathing helps you relax into the pose and safely deepen the stretch.
Tags
Train smarter with AI coaching
Tsemppi's AI gives you exact weights and reps for every workout. Progress every single session.
Start your free 7-day trial✨ Limited spots available • No credit card required